

Having visited some greco-roman sites during a short trip to the Mediterranean, the avid wargamer and lazy crafter in me noticed some simple looking lozenged shelves filled with scrolls in one of those reconstructed touristy spots.
In this tutorial, I will explain how I made lozenged scroll shelves for my 28mm miniature wargaming purposes. 🙂
Materials used :

- 2mm thick balsa wood
- wood glue (any PVA glue will do)
- a cutter and an exacto knife
- sand paper
- a metal ruler for cutting and other measuring implements
- a sharp pencil
- a filebrush
- some colours (will be specified later)
Step 1: Cutting

First I cut the main elements of the shelves. They will later be glued together in ye olde boxy shape we all love and want for our shelves.
The rear boards are 40x40mm. I find that 40mm is a good height for my 28mm wargaming needs. Especially since I took the habit to make rooms and walls 50mm high.
The two side boards are 15x40mm. The top and bottom boards are with 17x46mm slightly larger in order to crate an overlap. Initially I wanted the bottom board to be a bit thicker (as you might notice on the picture). But I decided otherwise during the crafting process.
Step 2 : Adding texture
Balsa has not enough texture for my taste. I use a metal filebrush to roughen up the surface. Carefull here: place it flat on the table and pass a few times over it. If you keep it in your hands (as you whould file a small stone or metal thingy) you might break the balsa.
With my trusty pencil I scratched some lines in the boards to indicate panneling. A note on this point: make sure to make the line deep enough without braking the balsapiece. I realysed during the paintjob, that I should have done so (see below).


Step 3 : ye olde boxy shape

Having all the pieces for the main structure ready I glued them all together. Be mindful to put the right pieces together… not that I made the mistake to mix up side and top pieces… noooo… -_-
If you have a tendency to water down your PVA glue, you have to remember that balsa soaks up water. Don’t use to much water in your glue, if you don’t want the balsa to bloat.
Here I use baking paper to let it dry. Thus my shelf won’t be glued to my cutting board.
Step 4 : Shelving
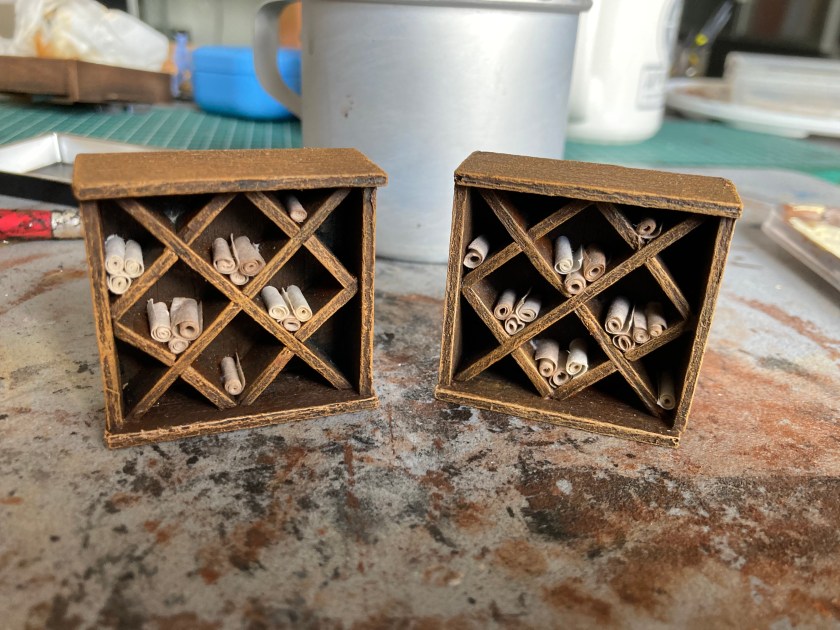
I wanted the shelfboards to have that antique look by aranging them lozenged/diamond-shaped.
The entire endeavour is the result of a lot of eyeballing and hope.
The pieces are 10mm deep, giving the shelf a more organic look. I first inserted the larger cross shape, before dividing the remaining space witch smaller pieces. Notice the I tried (not always with success) to make the balsa pieces fit in properly without creating ugly gaps. To acchieve that, I sanded some edges down to a (approx) 45° angle.


Step 5 : Painting
First I primed the entire modell with a mix of black and mod podge (insted of modpodge you can use PVA glue too… is cheaper). I aim to both protect the fragile balsa and have a surface on which my colours will stick later. As a bonus: the black colour will create shadows in the areas where I was sloppy with the main paint job 😉
As base colour I used burned umber. My go-to colour for wood was a more greyish dark brown, but I find burnt umber has a nice warm glow, that goes well with furniture. I gave the shelf a few coates in order to cover it properly.
To bring out the wooden texture, I gave the entire shelf first a rough drybrush with sienna (I ran out of ochre), before giving it another quick and very light drybrush with a mix of ivory and sienna.


In the end:
And here you see the final results of my meagre attempt at carpentry.
I added some scrolls. The later are small strips of paper that I dipped into the brownish paint water and rolled up before I glued them in. Zero effort, but I like the result. Hopefully this tutorial helps and inspires you to craft your own 28mm miniature shelves.
3 comments