

PART 1 : a very lazy and cheap build
This tutorial (a very generous word for what it is) is the result of our weekly crafting challenge : a fence that can be used for 28mm wargaming.
the entire building process took about two-ish hours and was very straightforward.

Materials used :
coffee stir sticks, tooth picks, leftover styrofoam

Tools used :
a ruler, a sharpened pencil, a cutter, a fine pincer. not in the picture : glue and some tape
1. cutting and gluing the fence


First I taped the coffee stir sticks onto my (very used) cutting mat. Mr Skelly was used to gauge the dimensions and proportions of the different fence parts. I settled for a 2,5 cm space beween the main bars and 1cm between each vertical bar.
Later I put a small drop of non watered down pva-glue at each connection and let the whole thing dry.
In the end, I had fashioned three fence segments of 9cm and two of 6cm length.
In one segment I cut out a piece of a bar with the fine clipper… no particular reason. I was just curious how it’d look in the end. 🙂
2. the base

I imagined the fence being set in a stone base.
In order to do so, I cut some Styrofoam strips (at least 1cm wide) and adapted the length to the fence segment.
Next comes your classic pencil and aluminum foil lump technique, to apply texture and indicate the stonework.
I decided to round of the corners of the strip. That way, I could connect the different segments in angles without making it look awkward… hopefully.

Sadly I forgot to take a picture for one step. In order to insert the bars properly into the Styrofoam base, I punctured it at the different spots with a toothpick. I wanted to avoid needlessly ripping the foam apart by pressing the fence in.
the fence was then glued into place… et voila: Mr Skelly enjoying his very own graveyard fence.


The Styrofoam bases were sturdy, but not heavy enough and prone to topple over. I therefore added some small stones at different places, to give them additional weight.

Because I had some time, added a doorway using the same material and techniques. The hinges are made of craft wire and a lot of patience.
PART 2 : A very sloppy paintjob
Colors and other stuff used:
Modge Podge, Black, Burnt Umber (a reddish brown tone), dark grey, light grey, beige, two different shades of metal

First, I covered the Styrofoam bases with a very thick coat of modge podge mixed with black. Make sure to be thorough, otherwise you’ll regret it in the next step.

In order to get a sleek coat of black on the “metal” I used spray paint. If your Styrofoam isn’t properly covered, the spray paint will just eat it away. (please use spray paint in a well aired room)

The metalworks then got a thick drybrush of burned umber. The idea was, to make it look like rust once it got a overbrush with metal color.


The entire fence then got a drybrush (first) with a darker and a lighter shade of metal. Do not work to “clean” unless you want to go for that particular “new fence look” my neighbors love so much at their own fence.
I made sure to brush from the top down and not up and down. Hoping to (1) indicate a highlight and (2) give it a whiff of grime and rust.

The base got a first layer of dark grey. I made sure to leave the gaps between the stones black… it’s a free shadow effect.

Giving it a brush of light grey. We are getting there 🙂
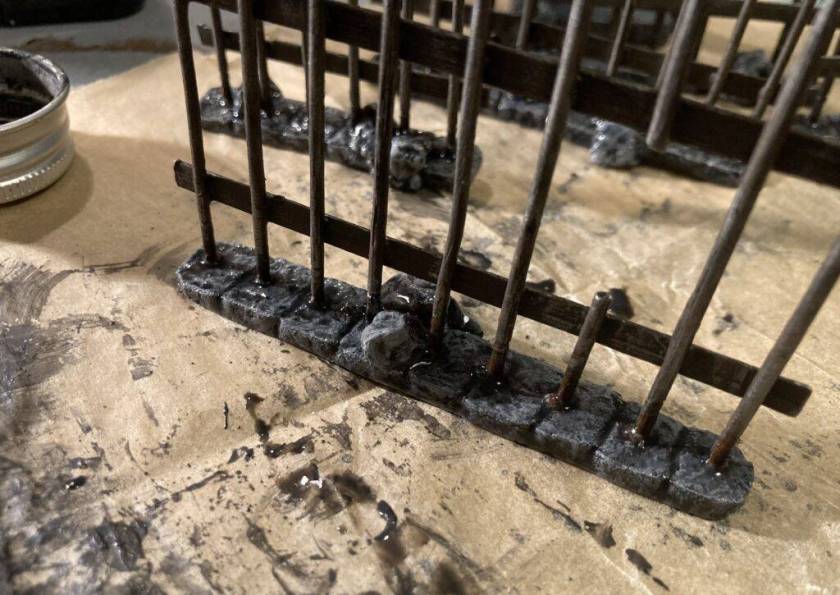
Uttering a brief prayer to the crafting gods, I apply a quick wash of black ink to the base, hoping it’ll cover some errors and reinforce the overall stone effect.
In the end, I was rather satisfied with my fence and look forward to use it in 28mm wargaming systems like Frostgrave or Sellswords and Spellslingers.
Lächeln! Du kannst sie nicht alle töten.